Posts

Thursday, 30 October 2014

A Button

This week is a busy week for me birthday wise. There are 6 birthdays I have to make cards for. This one is for my B-I-L. 


I CASed a card displayed at Split Coast Stampers by Cara Denise.
I thought it was perfect for a man. I used my special ruler to get the torn edge accurate.
I added paper to a bought enevelope.

Supplies: 
Sentiment: Computer generated.
Paper: Black and green gingham a free down load from Activity Village
Odd button
String from a local hardware store.
Jef Paper Tear edger
Card Stock in Kraft 180gsm

Monday, 27 October 2014

Flowers for Penny

This is the card which I made for my S-I-L for her birthday. We are in the middle of a postal strike so I hope it makes it's way to her on time. The strike has been going on for 6 weeks now but my understanding is that it's the workers who operate the international depot who aren't working so there is hope for this card, she lives in the same country just 600km away!!!


I CASed this beautiful card from Freshly Noted.
The pattern I used is the same one used for this card.
Supplies:
Pattern: Stitching Cards  Free flower bookmark pattern.
Flat backed pearls
Pink Card stock
Envelope made using Crafter's Companion
Liner: a free download but can't remember the source, apologies!

Sunday, 26 October 2014

Leopard

I'm taking part in Split Coast Stampers Queen for the Day challenge again this week. Our new queen is Lois. She has been creating cards for many years now and I have often been inspired by her work.
Here is my card to honour her


Leopards are by far my favourite big cat although I have yet to see one in the wild. The only one of the big Five that I haven't seen.
The card I was inspired by was this one.
Below is a card I made a while ago now using the same pattern. I don't think I'll ever do the yellow card stock again! It's combined with a blue not purple.


Supplies:
Pattern: Prick 'n Stitch Big Five
Thread: White or metallic copper
String
Paper: silver and blue
Card stock 180gsm in yellow and green
copper brads

Thursday, 23 October 2014

Blue Flowers


This pattern is another one of Joke de Vette's.
I love the simple elegance of it.
It was inspired by a stamped one but unfortunately I did not take note of the name of the contributor.

Another version of the same pattern. This time I took my inspiration from a card over at Splitcoast Stampers


Supplies:
Pattern: East Embroidery by Joke de Vette
Flat backed gems in clear and mauve
Border Punch Martha Steward
Green and silver narrow ribbon
Thread: White, blue and green

Monday, 20 October 2014

A floating flower

We have finally had some rain which has done more than just make a mess of my car's windscreen! It's amazing how quickly the grass has turned from brown to green. So to celebrate the rain I thought I'd share a flower card with you.

I had a lot of fun making this card and loved seeing the birthday girl's face when she saw the flower 'floating' on her card.


To achieve this illusion I used my smallest die to cut 2 card stock circles pricking the flower onto one of them and stitched it. Then I used the next size up circle to cut the outside, slightly overlapping circle twice. Once on the folded card and once on a topper. It is more accurate if you place one on top of the other and cut them at the same time. Next I used some thin clear plastic and stuck it in between the card and the topper and trimmed the edge. I then stuck the stitched circle on top of the plastic and secured the second smallest circle onto the back of the stitched one to hide the stitches. It all sounds very complicated but really it is actually quite simple.
The sentiment is computer generated and I printed this before die cutting any of the circles. Satin ribbon in cerise and some faux stitching in black finished the layout. I was very happy with how this card turned out.
I can't claim all the credit for this layout, I got my inspiration from Bellarose cards
Supplies:
Pattern: Easy embroidery on paper by Joke de Vette
Thread: yellow and cerise
pink flat backed gem
Cerise satin ribbon
black felt tipped pen
Plastic. Recycled fruit punnett
Die Cuts: Sizzix 8 circle

Sunday, 19 October 2014

Graduation Day

Recently I attended the graduation ceremony of a very special young lady who I am extremely proud of.
Her Mother was an employee of my Mom and I met her when she was just over three months old. She came from a home where money was always tight but despite this she worked hard at school and did very well. After completing her schooling there was no cash for any kind of territory education but undeterred she found a job and started saving. Nine years later she was able to enrol for a teacher's degree at a correspondence university and 4 years later, despite having a baby in her first year of study, she is now a qualified teacher.

Well done WM, you are an inspiration to us all.
Here is the card I made for her.


I CASed this lovely one from Bonnie.

Supplies:
Pattern: Stitching Cards   free butterfly pattern reduced to 50% of original.
Satin ribbon in peach.
Pale blue and black thread
Black beads
180gsm white card stock

Thursday, 16 October 2014

Red Flowers

The pattern I have used for these cards is a free one from Stitching Cards. I have found it a very easy pattern to adapt and will show you some of the other cards I have made in the months to come.
It's also a great pattern for a beginner.

I have stuck to the same layout for both these cards just changed the colour combination slightly.
The red ribbon in the first one is recycled from around the neck of a chocolate Easter bunny, the bell will be used for something else in time.
I have machine stitched around the edge of the white card stock and the edge of the entire card to finish the look.


Supplies:
Odd buttons
Ribbon: Lindt chocolate Easter bunny.
Thread: Dark green, red and metallic gold.
Pattern: Stitching Cards  Bookmark Flower
Papers: Paper Pizazz dots checks plaids and stripes

Monday, 13 October 2014

Tags for Boys

Yesterday I did the most incredible thing...... I touched an elephant!
Wow. I know that elephants are not called giants for nothing but somehow when you are standing right next to one looking up at him the true meaning of that phase becomes very apparent.

We went to a sanctuary where they have two elephants who through some very unfortunate circumstances have lived with humans for most of their lives. When the new owners tried to reintroduce them to the wild understandably they where now used to human interaction and would approach unsuspecting guests to the game park. This, as you can imagine, lead to a number of very frightening encounters, from the human side and so to save the elephant's lives they have been placed in this sanctuary where they roam free but of their own free will come to the visitors centre every day to see the guests. Over time this has developed into a scheduled attraction where it is now possible to feed and interact with these giants and all I can say is that it's an amazing experience. 

Anyway enough wildlife chatter and on to the cards which are actually not cards today but gift tags.
The tags I have for you today are all for boys.

I am always on the look out for fun stickers, charms, buttons or other kinds of embellishments which I can use for my tags. There is an endless scope out there you just have to keep your eyes open.

For the first two lots of tags I used stickers. The space and vehicle stickers are 3D.


I added glitter glue to the Space tags for a bit of bling


All these tags are hand cut and the sentiments are computer generated.

These little cars are wooden scrapbook embellishments


I did faux stitching around all or part of the tags to complete the look.
 Tag making is a great way to use up scraps of paper so I'm not sure if I will be able to supply all the brands or source locations for these papers.

Supplies: 
Clouds are free downloads from Phillipmartin
Glitzin' Glamour Crystalina
Stickles in Gold

Thursday, 9 October 2014

Hearts

In keeping with the "unintended" theme for this week here are two other heart cards that I have made.


and a copper version.


I was inspired to make this design after seeing this beautiful one by Jasu. I decided to adapt the pattern below.


To do this I enlarged one of the hearts and added a hole in between each existing hole.
The embossing was done by hand after the stitching was complete.

Supplies:
Pattern:Form-A-Lines Wedding Hearts
Stencil: Small brass stencils, make unknown
Flat backed gems in blue or champagne
Silver embossed paper: store bought
Sentiment pattern: Stitching Cards Words wedding

Monday, 6 October 2014

Painting Furniture

I am in the middle of painting some of the wooden furniture from our bedroom. There is nothing structurally wrong with it I just feel like I need a change and it's cheaper (not by much I have since discovered!!!) to paint than to replace so I have taken the plunge and started. I am doing a chest of drawers and if we like the result then I will do a few others.
At the moment I am waiting for the primer to dry so thought I'd sneak in a blog update. 

Today's card is for a 28th wedding anniversary


I CASed this card by Debby Hughes.
 First I stamped the kraft card stock in chestnut ink with the Amazing Grace stamp from Micia Crafts.
Then I cut out the circles. I attached the largest to the cream card stock and then machine stitched the grey line twice. Next I adhered the large checked circle and then the smaller craft one. My heart was hand cut and the buttons where two odds I had in my stash. I there secured the topper to a piece of black paper and then onto the folded A5 card which is also cream.
The envelope is store bought and given a bit of oomph by added detail on the flap.

Supplies:
Sizzies 8 circle dies
Stamp: Amazing Grace by Micia Crafts
Grey thread for machine stitching.
Black checked paper: Paper Pizazz Dots checks plaids and stripes booklet
Red Paper: scrap booking. Make unknown
Ink: Colorbox in chestnut

Sunday, 5 October 2014

Christmas Tags

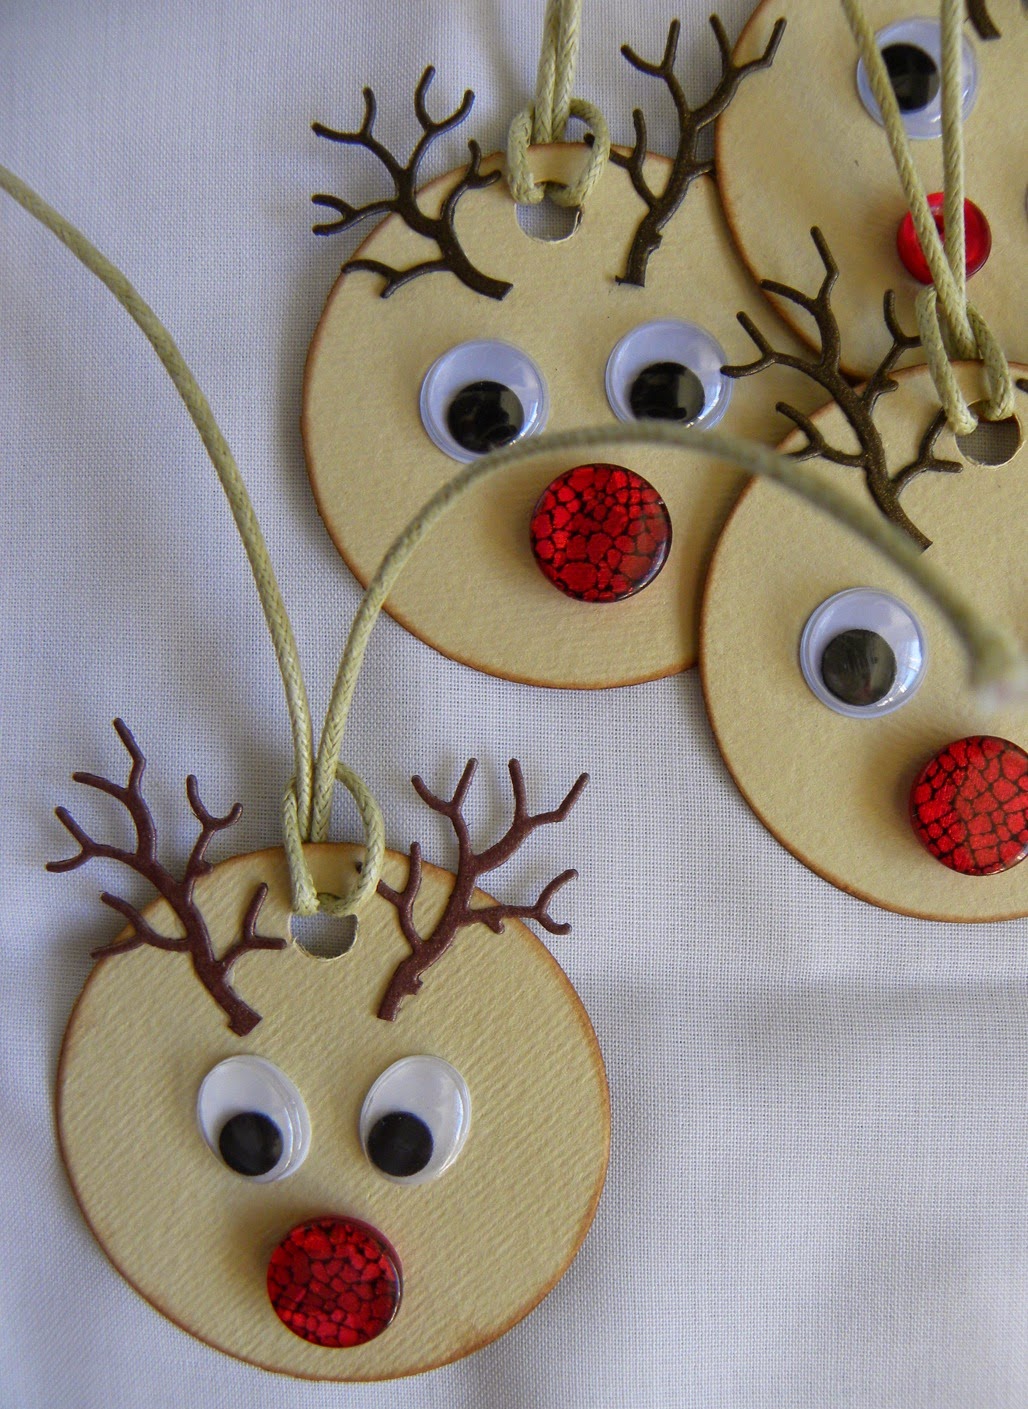
This month for my contribution to October's Christmas Card Challenge 2014 at Split Coast Gallery I have decided to concentrate on making gift tags.
Here are three different ones that I had fun making. I decided to stick to a circular theme.

Father Christmas tags,


I CASed these  punched Santa tags by Vicki and these Reindeer tags are from  Debby Hughes. Cute aren't they?


 I distressed the edges and used some left over buttons as noses. The antlers are actually a seaweed die.


My inspiration for the tree tags came from these lovely tags.
I die cut the trees and hand wrote the words.

Supplies:
Dies: Sizzies 8 circle die, Memory box exquisite coral Spellbinders Nestabilities 2013 Holiday trees
Red Felt tipped pen
Ink: Colorbox in chestnut
Glitzin'Glamour in Crystalina
Flat backed gems in pink and black
Flat backed pearls 

Saturday, 4 October 2014

Vintage lady

I have decided to take part in this weeks Queen for the day QFTD230 challenge over at Split Coast Stampers.
Here is my card.


Here are a couple of other versions of the same pattern. Over the years I have stitched this design often, in fact I suspect that all my female friends and relations have received one of this design sometime or another.


The black ribbon used above was recycled from a gift. I made all the little flowers.


Supplies:
Pattern: Stitching Cards  Lady with Umbrella
Embossed papers both store bought.
White Bow: Satin ribbon home made
Flowers: Olfa plier punch Bloemenponstang set 1
Glitter glue
Martha Steward border punch

Friday, 3 October 2014

Hearts and scrolls

Here is another scroll pattern taken from Erica Fortgens' book 'New Designs, New Projects for Embroidery on Paper'.

The layout is the same as these cards. I particularly like how the combination of the chartreuse green and red look together. I have used this combination many times since thanks to this card.


Supplies:
Pattern: Elegant Oblong Patterns in Erica Fortgens book 'New Designs, New Projects for Embroidery on Paper'.
Punch: Martha Steward Border punch
Flat backed gems in red
Thread: Chartreuse and red 
Paper: Scraps origin unknown